Microcontrollers(639)
- 8bit 8051 MCUs(88)
- 8bit KM101 MCUs(27)
-
Arm Cortex-M0 MCUs(293)
-
M029G/M030G/M031G Series(9)

-
M031 Series(21)

-
M031BT Series(2)

-
M032 Series(16)

-
M032BT Series(2)

-
M071 Series(4)

-
M091 Series(4)

-
M0A21 Series(4)

-
M0A23 Series(4)

- NUC029 Series(12)
- Nano103 Base Series(3)
- Nano100/102 Base Series(19)
- Nano110/112 LCD Series(19)
- Nano120 USB Series(10)
- Nano130 Advanced Series(8)
- NUC100/200 Advanced Series(15)
-
NUC120/122/123/220 USB Series(38)
- NUC120LC1DN
- NUC120LD2DN
- NUC120LE3DN
- NUC120RD2DN
- NUC120RC1DN
- NUC120RE3DN
- NUC120VE3DN
- NUC122LC1AN
- NUC122LC1DN
- NUC122LD2AN
- NUC122LD2DN
- NUC122SC1AN
- NUC122SC1DN
- NUC122SD2AN
- NUC122SD2DN
- NUC122ZC1AN
- NUC122ZC1DN
- NUC122ZD2AN
- NUC122ZD2DN
- NUC123LC2AE1
- NUC123LD4AE0
- NUC123LD4AN0
- NUC123SC2AE1
- NUC123LC2AN1
- NUC123SC2AN1
- NUC123SD4AE0
- NUC123SD4AN0
- NUC123ZC2AE1
- NUC123ZC2AN1
- NUC123ZD4AN0
- NUC123ZD4AE0
- NUC220LC2AN
- NUC220LD2AN
- NUC220LE3AN
- NUC220SC2AN
- NUC220SD2AN
- NUC220SE3AN
- NUC220VE3AN
- NUC121/125 Series(6)
- NUC126 USB Series(6)
- NUC130/230 CAN Series(14)
- NUC140/240 Connectivity Series(14)
- M051 Base Series(21)
- Mini51 Base Series(21)
- M0518 Series(4)
- NUC131/NUC1311 CAN Series(7)
- M0519 Series(5)
- M0564 Series(5)
-
M029G/M030G/M031G Series(9)
- Arm Cortex-M23 MCUs(77)
-
Arm Cortex-M4 MCUs(145)
-
M433 CAN/USB FS OTG Series(2)

- KM1M4BF Series(1)
-
M463 CAN FD/USB HS Series(7)

-
M467 Ethernet/Crypto Series(8)

-
M471 Series(6)

- M487 Ethernet Series(4)
- M485 Crypto Series(5)
- M484 USB HS OTG Series(5)
- M483 CAN Series(8)
- M482 USB FS OTG Series(14)
- M481 Base Series(11)
- M4TK Touch Key Series(6)
- M451 Base Series(10)
- M4521 USB Series(2)
- NUC442/472 Series(16)
- M452 USB Series(9)
- M453 CAN Series(10)
- NUC505 Series(7)
- M451M Series(6)
-
M433 CAN/USB FS OTG Series(2)
- Arm Cortex-M7 MCUs(3)
- 32bit KM103 MCUs(6)
MOSFET(73)
-
Low On Resistance MOSFET for Li-ion Battery Protection(47)
-
12V-30V Nch Dual MOSFET(47)
- KFCAB21B10L
- KFCAB21C00L
- KFCAB21860L
- KFCAB21520L
- KFCAB21B50L
- KFCAB21890L
- KFCAB21770L
- KFCAB21260L
- KFCAB21B30L
- KFCAB21740L
- KFCAB21490L
- KFCAB21A50L
- KFCAB21350L
- KFCAB21830L
- KFCAB12004NL
- KFC6B21150L
- KFC6B21B70L
- FC6B21100L
- KFC4B21A30L
- KFC4B21210L
- KFC4B21280L
- KFC4B21220L
- KFC4B21080L
- KFC4B21320L
- KFC4A21300L
- KFC4B21300L
- KFC4B21330L
- KFCAB22370L
- KFC6B22160L
- KFCAB22510L
- KFC6B22500L
- KFC4B22180L
- KFC4B22270L
- KFC4B22690L
- KFC4B22670L
- KFC4B22830L
- KFCAB22014NL
- KFCAB22020NL
- KFCAB22630L
- KFCAB22620L
- KFCAB22680L
- KFCAB22900L
- KFC6B22100L
- KFC6B22220L
- KFC4B22070L
- KFC7P23440L
- KFCAB30029NL
-
12V-30V Nch Dual MOSFET(47)
- Low On Resistance MOSFET for Li-ion Battery Charging Control(5)
- Small Size MOSFET for Automotive Switching(11)
- Small Size MOSFET for General Switching(10)
Smart Home Audio(325)
- Audio SoCs(20)
- ISD ChipCorder(28)
- Audio Converters(37)
- Audio Amplifiers(20)
- Audio Enhancement(3)
-
Audio & Speech Controllers(217)
- NuVoice Series(4)
-
PowerSpeech Series(128)
- N584L020
- N584L030
- N584L031
- N584L040
- N584L041
- N584L061
- N584L080
- N584L081
- N584L120
- N584L121
- N588H061
- N588H061
- N588H120
- N588H170
- N588H250
- N588H340
- N588HP340(OTP)
- W584A011
- W584A016
- W584A017
- W584A021
- W584A022
- W584A025
- W584A031
- W584A032
- W584A035
- W584A041
- W584A042
- W584A045
- W584A051
- W584A052
- W584A061
- W584A062
- W584A065
- W584A071
- W584A075
- W584A081
- W584A085
- W584A100
- W584A120
- W584A151
- W584A171
- W584A191
- W584A300
- W584A340
- W584AP017(OTP)
- W584AP065(OTP)
- W584B010
- W584B015
- W584B016
- W584B020
- W584B021
- W584B030
- W584B031
- W584B040
- W584B041
- W584B052
- W584B062
- W584B070
- W584B080
- W584B100
- W584B120
- W584B150
- W584B170
- W584B190
- W588C003
- W588C006
- W588C009
- W588C012
- W588C015
- W588C020
- W588C025
- W588C030
- W588C036
- W588C041
- W588C046
- W588C051
- W588C056
- W588C061
- W588C071
- W588C081
- W588C101
- W588C121
- W588C150
- W588C170
- W588C210
- W588C260
- W588C300
- W588C350
- W588C400
- W588D003
- W588D006
- W588D009
- W588D012
- W588D015
- W588D020
- W588D025
- W588D030
- W588D035
- W588D040
- W588D045
- W588D050
- W588D055
- W588D060
- W588D070
- W588D080
- W588D100
- W588D120
- W588D150
- W588D170
- W588D210
- W588D260
- W588D300
- W588D350
- W588D400
- W588DF060(MTP)
- W588L020
- W588L030
- W588L035
- W588L040
- W588L050
- W588L060
- W588L070
- W588L080
- W588L100
- W588L121
- W588L150
- W588L170
-
BandDirector Series(48)
- N567G030
- N567G041
- N567G080
- N567G120
- N567G160
- N567G200
- N567G240
- N567G280
- N567G330
- N567H030
- N567H041
- N567H080
- N567H120
- N567H160
- N567H200
- N567H240
- N567H280
- N567H330
- N567HP330(OTP)
- N567K030
- N567K041
- N567K080
- N567K120
- N567K160
- N567K200
- N567K240
- N567K280
- N567K330
- N567L120
- N567L160
- N567L200
- W567C070
- W567C080
- W567C100
- W567C120
- W567C126
- W567C151
- W567C171
- W567C210
- W567C260
- W567C266
- W567C300
- W567C306
- W567C340
- W567C346
- W567C380
- W567C386
- W567CP260(OTP)
- ViewTalk Series(20)
- Peripheral Series(17)
- NuSpeech Series
- NSPxx Series
IoT Solution(19)
-
IoT Platform(17)
-
NuMaker-IoT-MA35D1-A1

- NuMaker-IoT-M2354
- NuMaker-RTU-NUC980(Chili)
- NuMaker-Server-NUC980
- NuMaker-IIoT-NUC980
- NuMaker-IIoT-NUC980G2
-
NuMaker-IIoT-NUC980G2D

- NuMaker-Tomato
- NuMaker-IoT-M487
- NuMaker-PFM-M487
- NuMaker-PFM-M453
- NuMaker-PFM-NUC472
- NuMaker-PFM-M2351
- NuMaker-IoT-M263A
- NuMaker-PFM-NANO130
- NuMaker-Brick
- NuMaker-Uni
-
NuMaker-IoT-MA35D1-A1
- Alexa Connect Kit Platform
- IoT Engine Platform(1)
- Arduino Compatible Platform(1)
- LoRa Platform
NuMaker-IoT-M263A
Board Introduction | Board Features | Quick Start
Board Introduction
The NuMaker-IoT-M263A developing board, is launched to speed up product design cycle with the IoT software package provided by Nuvoton, connecting the cloud of Arm Pelion, Amazon AWS, and Ali-Cloud is easy to use.
The NuMaker-IoT-M263A consists of two parts, the M263 platform with popular on-board wireless-connectivity/sensor modules, and an on-board Nu-Link2-Me debugger and programmer. The NuMaker-IoT-M263A allows users to quickly develop IoT ( Internet of Things ) related products and easily program and debug application.
The main microcontroller of NuMaker-IoT-M263A is M263KIAAE, with low power and robust security features. The NuMaker-IoT-M263A provides Arduino UNO compatible extension connectors, various power supply option and ammeter connector, makes it is easy to extend functionality and take current consumption measurement
The NuMaker-IoT-M263A provides popular wireless connectivity modules that used in IoT applications, include Wi-Fi, Bluetooth and LoRa modules. The NuMaker-IoT-M263A also supports a mini PCIe connector for inserting external modules to realize 3G/4G/NB-IoT connectivity functions, such as QUECTEL BG96/EC21 modules. Besides, the NuMaker-IoT-M263A integrates BOSCH environmental sensor and 9-axis sensor for acceleration, geo-magnetics, gas, barometric pressure, temperature and humidity sensing. Furthermore, the NuMaker-IoT-M263A supports CAN and RS485 transceiver for industrial control application.
The Nu-Link2-Me is a debugger and programmer that supports on-line programming and debugging through SWD interface. The on-board 16 Mbit SPI Flash allows it to off-line program the target microcontroller. The Nu-Link2-Me provides virtual COM port ( VCOM ) function to print out messages on PC. The Nu-Link2-Me can be separated from NuMaker-IoT-M263A, allowing user to use it as a mass production programming tool.
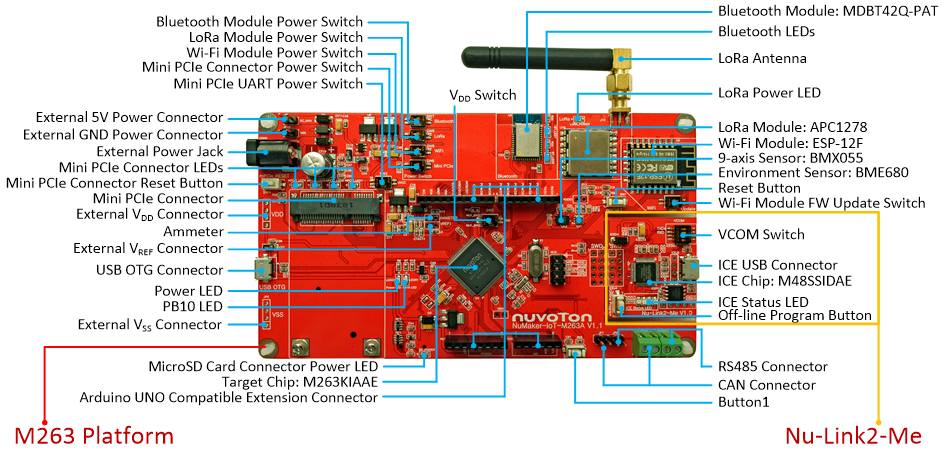
|
Board Features |
|||||
| • | NuMicro® M263KIAAE used as main microcontroller with function downward compatible with: | ||||
| - | M261ZIAAE | ||||
| - | M261SIAAE | ||||
| - | M261KIAAE | ||||
| - | M262ZIAAE | ||||
| - | M262SIAAE | ||||
| - | M262KIAAE | ||||
| - | M263ZIAAE | ||||
| - | M263SIAAE | ||||
| • | On-board modules: | ||||
| - | Wi-Fi module: ESP12-F | ||||
| - | Bluetooth module: MDBT42Q-PAT | ||||
| - | LoRa module: APC1278 ( for 408 / 433 / 470 MHz ) | ||||
| - | LoRa antenna: ANT60-433LA ( for 433 MHz ) | ||||
| • | On-board sensors: | ||||
| - | Environmental sensor: BME680 | ||||
| - | 9-axis sensor: BMX055 | ||||
| • | Mini PCIe connector ( QUECTEL BG96/EC21 Is available for purchase to extend NB-IOT/3G/4G function ) with SIM card connector | ||||
| • | CAN and RS485 transceiver | ||||
| • | MicroSD card connector | ||||
| • | Arduino UNO compatible extension connectors | ||||
| • | Ammeter connector for measuring the microcontroller’s power consumption | ||||
| • | Fixable board power supply | ||||
| - | External VDD power connector | ||||
| - | Arduino UNO compatible extension connector VIN | ||||
| - | USB OTG connector on M263 platform | ||||
| - | ICE USB connector on Nu-Link2-Me | ||||
| - | Power jack for mini PCIe connector | ||||
| • | On-board Nu-Link2-Me debugger and programmer: | ||||
| - | Debug through SWD interface | ||||
| - | On-line /off-line programming | ||||
| - | Virtual COM port function | ||||
|
Quick Start |
|||||
| 1. | Install the preferred toolchain. Please make sure at least one of the toolchains has been installed. | ||||
| - | KEIL MDK Nuvoton edition M0 / M23 | ||||
| - | IAR EWARM | ||||
| - | NuEclipse (GCC) ( Windows ) | ||||
| - | NuEclipse (GCC) ( Linux ) | ||||
| 2. | Download and install the latest Nuvoton Nu-Link Driver. Please install the Nu-Link USB Driver as well at the end of the installation. | ||||
| - | Download and install Nu-Link_Keil_Driver when using Keil MDK. | ||||
| - | Download and install Nu-Link_IAR_Driver when using IAR EWARM. | ||||
| - | Skip this step when using NuEclipse. | ||||
| 3. | Download and unzip the Board Support Package ( BSP ). | ||||
| 4. | Hardware Setup | ||||
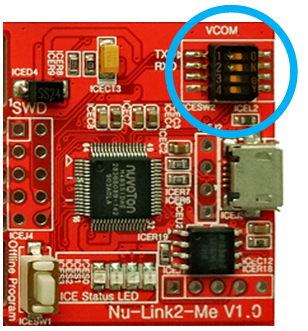
| (1) Open the virtual COM ( VCOM ) function by changing Nu-Link2-Me VCOM Switch No. 1 and 2 to ON. | |||||
|
|
|||||
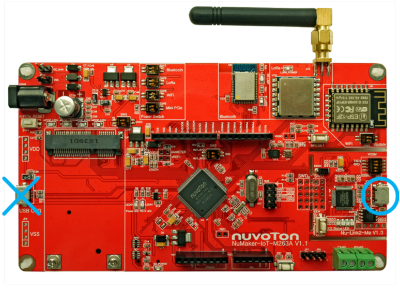
| (2) Connect the ICE USB connector to the PC USB port through USB cable. | |||||
|
|
|||||
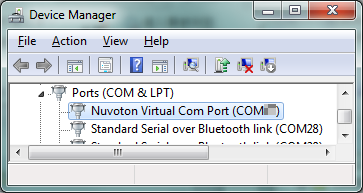
| (3) Find the “Nuvoton Virtual COM Port” at Device Manger. | |||||
|
|
|||||
| 5. | Use the “Template” project as an example. The project can be found under the BSP folder. | ||||
| - | M261_Series_BSP_CMSIS_V3.XX.XXX | ||||
| - | SampleCode | ||||
| - | Template | ||||
| - | GCC | ||||
| - | Keil | ||||
| - | IAR | ||||
| 6. | Open and execute the project under the toolchain. For detail setting, please refer to the NuMaker-M263KI User Manual. | ||||
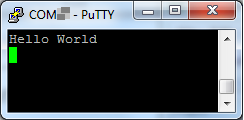
| 7. | User can see the result in the ternimal window on PC. | ||||
|
|
|||||
|
Resources |
|||||
|
User Manual | Microcontrollers | Software Development Tool | Driver (BSP) | Programmer | Nuvoton Official Forum | Nuvoton eStore | RF-BG96A | RF-EC21A Welcome to download the Nuvoton IoT resource reference file (https://www.nuvoton.com/iot_startup). The content includes rich information, such as development resource, quick-start examples, application tutorial videos, etc.
|
|||||
